Sunday 18 November 2012

American Haul - Makeup, Makeup, Makeup!!!

Hello Hello Lovely people!
I hope you are all having an amazing weekend! I have recently come back from America. I was gone for 19 days and went to New York, Niagara Falls and Hawaii.
As most of you know Makeup is a lot cheaper in America than it is over here in Australia. MAC itself is half the price in America, so you can safely say I had A LOT of fun while I was over there!
I got a fair few amazing products so I thought I’d show you some of the ones I absolutely LOVE!!!

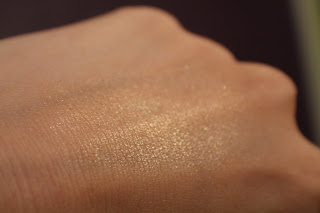
1.       MAC Lustre Drops in Pink Rebel.
Don’t you hate when your doing your makeup and you just want to have a nice dewy look but the only foundation you have is a matte foundation? Well this is the answer to all your problems! What I do is put the foundation (or BB cream as you know what I use) on the back of my hand and then put 2 -3 drops of the Lustre Drops on top of it and then mix it in. Then I put the product on my face as I would usually. It adds just a beautiful subtle sheen to your face. It comes in 2 colours. I purchased the goldy pink colour as I thought it’d be more natural. It comes in a small little dropper bottle but a little goes a long way, so the product would last a long time. I purchased this in America for $20USD but I expect it would be about $40AUD in Australia. Check it out here. www.maccosmetics.com.au.


2.       MAC Face and Body Limited Edition Pressed Powder Eyeshadows.
Now these are my official new loves. I actually saw one of these colours on the Makeup Artist in store and told her I must have that colour! Turns out there were multiple colours so me being me I bought all the ones that weren’t sold out. Unfortunately, 3 were sold out but I still was able to get 3. They were all different brown colours ranging from really really light to darker browns. They have a frosted sparkle to them and look absolutely amazing by themselves or over the top of just a plain brown over the lid. I use the MAC Fix Spray which I actually bought while I was over there as well. All you do is spray it on your brush and then put your brush in the eyeshadow and put it on your eyelid. The best thing as well when you’ve finished your makeup you can spray the Fix+ over your face and it sets your makeup – you know how I LOVE dual purpose products. I purchased the colours “Spot Lit” which is a light to medium brown. “Warming Heart” which  is a very light brown – almost a champagny brown. “Beaming” which is a Dark Brown. I can’t remember but I believe the fix+ was $20USD. You can buy the 100ml bottle in Australia for $27.00. The Eyeshadows were $20USD You can buy these for $40AUD in Australia (please keep in mind though, these are limited edition and will be selling very quick so may not be available.  Check it here www.maccosmetics.com.au .


3.       Napoleon Perdis Loose Eyeshadow in Mosaic Gold.
Although, I’m not generally a fan of Napoleon I do like some of their eyeshadows. I was in the airport in Sydney waiting for our connection to Brisbane so to waste time I went to have a look. I saw this colour and had to buy it. It is one of the prettiest colour and would look amazing on any skin tone. It looks white but when you put it on it’s an opaque pewter gold colour. It is very difficult to explain but it's so beautiful. I use it as a highlight and the nicest thing is you can change the contrast a bit. I sometimes put a white eyeliner pencil in the inner corner/tear duct area and then put it on top. It looks a bit white/pewter/gold like that but when I put it directly on the inner corner it gives more of a gold/pewter colour. It’s very subtle so it can be used for every day but then would look amazing for formals and weddings. I cannot wait to use this baby a lot more. I bought this eyeshadow for $35.00AUD. There a multiple colours available ranging from gold to brown to black to blue. Check it out here www.napoleonperdis.com.au.


4.       Urban Decay Naked Palette.
So I have wanted this Palette for SO long. I will do another blog on both of the palettes so I’ll go more in depth in that one. Here in Australia Urban Decay is pretty much impossible to get your hands on so I was lucky enough to get the Naked 2 Palette on EBay a few months ago but got this one while I was in America in Sephora. This Palette is the best go to palette EVER! It has neutral colours – Browns, blacks, highlights, greys, Golds, Silvers. They are very pigmented so you don’t have to put heaps of product on your brush just to get a little bit of colour. The eyeshadows are also nice and soft to go on. Another awesome thing is you get a free little Primer Potion in the Palette and also a brush. The primer potion is really good as well. I had already heard good things about it, but happy I had the opportunity to test it out myself. I love that if I’m going away or going to my friends place for the night I can literally put this in my bag and I can do so many different Makeup looks with just one small palette.  I have put swatches in the picture as well. I purchased this for $50.00USD. If you’re in Australia try and find it on EBay?.  Check it out www.sephora.com.


Well I hope you are all having/had a good weekend. If you  have any questions about how to use any of these products or any suggestions let me know.

Have a Beauty-ful Day/Night
Belinda
xx

Wednesday 31 October 2012

Beauty with Belinda's Must Have Brushes!!

Happy Halloween Lovely people!!!!

Tonight, I wanted to discuss brushes.. I get asked all the time what type of brushes to use and what brushes are the easiest to get the best results. I do a fair few classes where I actually teach the techniques of these brushes which I can most certainly do on YouTube if you guys are wanting that kind of thing??

Obviously, this is my opinion. Every person has a different opinion, especially Make-up artists, but it is personal preference and I prefer these brushes and I find they give a beautiful finish and by far the easiest.

I have used Images from the Makeup and Glow website. My brushes are obviously not brand spanking new and I use them a lot so I preferred to put up pictures that look a lot nicer :). I don't use all of these exact Brushes but I know for a fact Makeup and Glow stock absolutely beautiful brushes, but obviously the brushes all pretty much do exactly the same thing.

1. Makeup and Glow Bent Detail Liner Brush #120
   - This brush is amazing if your not that great with putting on eyeliner. It pretty much does your whole job for you. You just put the brush in some gel liner ( My favourite is the Makeup and Glow Gel Liner in Black ) then run the brush along the eye as close to the lash as you can get and then once you get to the end the bent part of the brush does the perfect flick so you can have a subtle flick or a dramatic cat eye look.
You can purchase this Brush for $9.90 (before discount) http://www.makeupandglow.com.au/Makeup-and-Glow-Bent-Detail-Liner-120-p-16945.html
2. Makeup and Glow Blending Brush #26
    - This Brush is a MUST! Any Makeup Artist will tell you that this is one of the best inventions. It's pretty much self explanatory. This brush can make a simple look go that little bit further in detail. It smooths out any lines that you have when you apply your eyeshadow and obviously blends everything in together.
You can purchase this Brush for $14.40 (before discount)
3. Makeup and Glow Crease/Bullet Brush #250 
     - This Brush is as well pretty self explanatory. It is a brush so that if you're wanting a bit more definition through your crease you can put it through the crease (the hollow in your the separates your lid from your upper eye) also, I use it in the very side corner of the eye when you want to add that little bit extra depth with another colour (for example a bit of black with a smokey eye to make it a bit darker but not over the top dark). You can also use this brush on the lower lash line to add some dimension with out a harsh line. 
This Brush can be purchased for $22.90 (before discount)
4. Makeup and Glow Pro Powder Brush #340
   - Everyone should have a powder brush, whether it's to put some powder on every day or if you prefer to use one brush for powder, blush and bronzer. It is a very good staple brush. Especially if your travelling it can save you on packing a few brushes. Once I put my powder, bronzer and blush on (I personally use all different brushes for all) I get a powder brush and just brush it over my face just to make sure everything blends beautifully together (especially if your doing your makeup half asleep and it's dark - haha).
This Brush can be purchased for $26.90 (before discount) http://www.makeupandglow.com.au/Makeup-and-Glow-Pro-Powder-Brush-340-p-16960.html
5. Designer Tools Large Fluff Shadow Brush - 463-10
   - I am in love with my fluffy brush! It's almost like the blending blush but bigger and less definition. I use the Blending brush when I want to add a bit more depth to my work. You can use this brush to blend out any lines as well. But also I use it when my work needs a bit more softening. I put it in a light brown and put around the crease/above the crease and the general eye area and it looks amazing. 
This brush can be purchase for $5.95 (before discount) http://www.makeupandglow.com.au/Large-Fluff-Shadow-Brush-463-10-p-17394.html

6. Duo Fibre Buffer Brush
   - I am seriously in LOVE with this brush.. I don't wear foundation like ever but as you know I do wear BB cream (almost like a tinted moisturiser) I put a bit of my BB cream on the back of my hand then use my finger to disperse it around my face. I then get the buffer brush and buff it into my skin. What I love about it is, you really don't have to use a lot and it gives you a beautiful flawless look without feeling caked on. A definite must this brush!
This Brush can be purchased for $26.95 (before discount) http://www.makeupandglow.com.au/Duo-Fibre-Buffer-Brush-p-17663.html

7. Designer Tools Angled Contour Brush - 417-18
   - Once again a self explanatory brush - makes my job easier yay! So contouring is an amazing technique, it can make your nose look smaller, your forehead look smaller, your cheekbones stronger, your jawline stronger, can hide the double chin a bit - I could go on for days but my point is... it's awesome!. So every day you obviously do not want to contour hard core so this brush makes it easy. All you do is put it in your bronzer, and turn the brush to the side so the higher point is facing towards your mouth or to your ear (it's personal preference what feels more comfortable to you) just under the cheek bone and brush away! - if you cannot find your cheekbone do the always popular fish  face and you can find the indent where you're meant to put the bronzer to make it more prominent. I also put a bit of bronze in my temple area and if you have  a big forehead just dust it across the side and top of your forehead. You can of course use this brush as a blush brush as well just sweep it across the apples of the cheeks and up.
This Brush can be purchased for $7.95 (before discount) - http://www.makeupandglow.com.au/Angled-Contour-417-18-p-17384.html

8. Designer Tools Small Eyeshadow Brush - 429-06
   - There's nothing ridiculously special or amazing about this brush, it's just a good and easy brush to have. It's exactly what it says. if you're having a lazy day and just want one colour of eyeshadow on your lid - well this is your brush. I use a brush like this all the time just to put the base eye shadows on and then from there you can use the blender brushes and crease brushes to add more dimension and depth.

This Brush can be purchased for $8.95 (before discount) - http://www.makeupandglow.com.au/Small-Eyeshadow-Brush-429-06-p-17385.html

9. Designer Tools Fine Angle Liner Brush - 406-06
  - I use this brush multiple ways. I use it as a brow definer. I just put it in some brown eyeshadow - or whatever colour you need and then brush it through your brows and then you can put it on it's side and define those front parts of your brows that have a lot spacers (well I have those kind of brows :( ). It gives you a beautiful defined brow without looking like they've be drawn on. Another way to use it is for liner. Some people put it in gel liner and brush it against the lid along the lash line. I actually put it in black eyeshadow and go over the top of my gel liner that I put on with the Bent Liner so that it gives a bit more staying power for the Gel Liner. Another way is I put it in what  ever colour I need (usually brown or Black) and put it against my lash line on the bottom lasshes. I have very dark eyes so it looks very funny if I just put liner on the top but I don't want to have strong liner along the water line etc every day so it gives it a bit of definition but it's soft and flawless..
You can purchase this brush for $7.95 (before discount) http://www.makeupandglow.com.au/Fine-Angle-Liner-406-06-p-17378.html

Obviously, there are a lot more brushes that I absolutely love, but if I went on holidays or was stuck on a desert island with just those brushes and products I would have amazing makeup every day.

If you have any questions at all please let me know. I'm going to put together a YouTube video tomorrow explaining brushes and showing how to use them - as it's a bit hard to explain in writing sometimes.. I think I did OK though.. right??

Well I hope everyone is having an absolutely fantabulous night (yes, tonight I am making up words). Please be safe and anyone from America that tunes into my Blog I hope you are all safe and pray that everything settles down for you and there is not a lot of damage to your lives because of this heart wrenching tragedy. Australia sends all of our love and support.

Have a Beauty-ful Night/Day!!

Belinda
xx


Monday 1 October 2012

Review: Blinc Mascara

Good Evening Lovely people!!

I am just soo excited to talk about this product!! I was given this product to play with from Makeup and Glow, here in Brisbane as they were so excited about this product they wanted to see I would agree.. and let me tell you – I certainly do!!.
Do you ever get sick of clumpy lashes? Or us emotional girls, looking like a panda or some crazy person from Nightmare on Elm Street afterwards? Or getting that awful fallout of clumps under your eyes? Or that horrible horrible lashes sticking together so it looks like you have 3 lashes? Well I have the answer for you!
Blinc Mascara. This Mascara literally puts a little tube around your lashes so you’re not painting them. Once it’s applied to your lashes it cannot run, smudge, clump, or flake. Another pretty awesome thing about it – especially for people like me. I always want to rub my eyes as I have allergies. With this Mascara if something happens and you desperately need to rub your eyes – you can! ( Although you may ruin the rest of your eye makeup – haha). It adds length so it gives you that added va va voom. It literally doesn’t budge until you are ready for It to come off. When you decided it is time for your amazing lashes to go away for the night all you have to do is use warm water on a wash cloth or anything along those lines and it’ll literally just slide off. This product is perfect for those sensitive eyes and contact lense wearers.
This amazing product can be purchased from Makeup and Glow instore or online www.makeupandglow.com.au for $34.95 (If you’re a Makeup Artist you are entitled to a 10% discount). I would highly recommend visiting the lovely ladies in shop or having a look online. They know everything there is to know about Makeup and also have a Makeup Academy now so for you that would like to be a Makeup Artist or if you already are and want to brush up on your skills definitely check them out.
Hope you have a Beauty-ful Night/Day.
Belinda
xx


Reviews: Blush's I love (Cream and Powder)

Hello my lovely ladies/gents!

Tonight I thought I'd write about blushes... Some of us only use a little bit just to add a little bit of colour to ourselves but some of us also use a lot. Fellow Makeup Artists also use them for different looks we want to achieve for brides, editorial or print work as well.. Either way it is very much a staple for any female..and some of you males out there too.

I'm going to go through my favourite blushes that I've been playing around with a lot lately. I'm going to incorporate some cream blushes as well as sometimes for print work we need to avoid powder, but sometimes it's just peoples preference.

1. I have already blogged about NARS Orgasm before but it needs another mention. This is always in my make up kit or bag. It it a beautiful colour that isn't too full on and will look absolutely beautiful on most skin tones. Find here www.nars.com.au

2. Makeup and Glow Mosaic Blushing powder. This beautiful blush is a mosaic one, so it has many colours all in one so you get more a unique colour. This one in particular called "blushing" has some beautiful pinks, deep pinks, browns and a beautiful highlight white so you also get that gorgeous highlighted look. This blush goes on beautiful and you can build it up or just a little bit to add some colour. You definitely get a lot of bang for your buck with this product as you don't need a lot of product which I absolutely love. For those people who have sensitive skin, this would be perfect for you as it's hypoallergenic. Find here www.makeupandglow.com.au. This can be purchased for $33.00 from Makeup and Glow in store or online. I was kindly provided this product by Makeup and Glow

3. Graftobian Hi-Def Glamour Creme Blush Palette. Now this product is for you out there that don't necessarily like the feel or look of powder products. There are 5 different colours in this palette and this specific one ranges from peachy pinks all the way up to burgundy and deep red. These are so beautifully creamy I literally want to just put them on my skin all day. The awesome thing about these are their a double product you can most certainly use them as lipstick as well - woohoo!. This particular palette really is so versatile as it will suit any skin tone - so would be perfect for you Makeup Artists out there who don't want to pay $30 for each blush. You can get 5 colours for $33.00 (also remember if your a Makeup Artist you can get a 10% discount. Find here www.makeupandglow.com.au. I was kindly provided these by Makeup and Glow. 

4. FACEatelier Facade. Once again this is another beautiful Creme Blush, but can also be used as a lipstick. It is a beautiful deep pink colour -called Arabesque. This is beautifully soft and smooth on the skin and just goes on like a dream. It is extremely easy to work with so the people out there that don't have the experience, yet wants to try something different - you can't really go wrong with this product. And like previously stated it's awesome that you get two uses for one product. This can be purchased online or in store at Makeup and Glow for $36.00. Find here www.makeupandglow.com.au. I was kindly provided this product by Makeup and Glow.

Have fun ladies with your blush. If you want it as just a bit of colour or as a bold expression just have fun with it and you'll feel amazing. Obviously, as usual if you have any questions or suggestions of other products to try please let me know..

Have a Beauty-ful night/day.

Belinda
xx


Sunday 16 September 2012

Review: BLYNC Eyelashes

Well Hello Lovely Ladies/Gentleman!

So tonight's blog will interest pretty much anyone who has any interest with Makeup whatsoever!.

Whether, you love something over the top dramatic, or just accentuating your natural eye or maybe you have a few bald spots and need a few individuals to go in - the fact of the matter is we all love false lashes!!

Me, personally - I love the lashes that just accentuate your natural eye but obviously, being a Makeup artist it is a bit fun to add some really dramatic lashes for a fun look. I am a bit picky when it comes to Eyelash brands as sometimes they do not look like your eyelashes and they stick out like sore thumbs and some aren't soft and uncomfortable to wear and I wouldn't wear that so I wouldn't expect anyone to wear them.

As I have said in previous blogs, I was lucky enough to be given some products from Makeup and Glow here in Brisbane and these babies were in there. I have 3 sets here.
       1. Rosebud - these are beautiful Natural strip lashes, and also can be cut in half as half lashes if you're not wanting something so big.
       2. Audrey - These are some gorgeous dramatic lashes - they would look stunning for a dress up party or if you have done a deep smokey eye or with some glitter. I wouldn't recommend these if your wanting something very subtle and natural.
      3. Cha Cha Cha - Now these are my favourite and I use these all the time with Brides, as usually they don't want something dramatic but still want a little somethin' somethin'. They are 3/4 lashes so you don't have to worry about the drama of cutting the lashes - yay!.

These lashes are amazing quality, they feel comfortable - even the big luscious ones. They are quite soft so they blend in nicely with your natural lash.

What I like most about these are that they're easy to use. Some lashes that are around take so long to put on, and you sort of get so sick of playing around with them you just give up and put an extra coat of lashes on.

If you don't know how to put lashes on all you have to do is do your Makeup as you want to, put a coat of Mascara on your natural lashes and then take the lashes off the tray carefully. Put some lash glue along the strip, I like to let it dry a little bit for a few seconds and then place one side of the lash on and then work your way along the rest of the lash. Then let them dry so they don't budge.

I get a lot of brides get worried about how to take lashes off. Do not stress my pretties, you literally just get one edge of the lash and pull off gently at the end of the night. It won't hurt, it won't stay on for a few days - so it's all nice and easy!.

These lovely lashes can be bought for $9.95 (Remember you may be entitled to a trade discount as well)  at Makeup and Glow (online or in store) and there are many different lashes available ranging from dramatic, natural and individual lashes.

Check out Makeup and Glow www.makeupandglow.com.au.

Hope you have a Beauty-ful Night/Day!!

Belinda
xx


Saturday 8 September 2012

Review: Lime Crime Lipsticks

Good Evening my lovely followers!

Tonight we're going to talk about Lipstick! Are you looking for a nice creamy lipstick in AWESOME Colours?? I am have the answer for you.

Lime Crime Lipsticks are a brand that we often don't hear about here in Australia but some of you may recognise the name if you're an avid YouTube watcher. But take my word on it, you are definitely going to be hearing about it a lot more!.

I was lucky enough to get the colour "Coquette" from Makeup and Glow to play with and golly gosh have I used it a lot. They are extremely pigmented so you don't have to worry about putting coat after coat after coat on, you literally just need to put one coat on and your good to go!. It doesn't go dry after a few hours and make your lips look dry, they just look luscious and soft and nice and coloured. The "Coquette" colour is a beautiful Nudey/Pink colour which I absolutely love and think it's a perfect every day colour and also for wedding as it gives a little bit of colour but isn't the concealer Nude colour that people seem to do?.

One of the best things about this product is it's Vegan/Animal cruelty free - woohoo.

If you are into the bright bright fun colours you definitely won't be disappointed with this brand because they have greens, blues, purples and pinks but then also the nude's and everyday colours that I have.

(and how cute are the containers - adorable!!)

Please be careful with these though, as they are so creamy and pigmented they are more delicate than the normal lipsticks. So just be too tough when applying and keep them out of the heat.

You have 13 colours to choose from and they can be purchased for $19.99 (Before Trade Discount) and you can get them online or in store at Makeup and Glow (www.makeupandglow.com.au).

Hope you have a Beauty-ful Day/Night!

Belinda
xx


Review: Indelible Cream Shadows from Makeup and Glow


Why Hello Beauty-ful People!

I'm so excited to do this blog as I do not know how I survived without these babies in my makeup bag/kit and obviously want to share the awesomeness that these are!.

I was lucky enough to be given 2 of these beautiful cream shadows from Makeup and Glow to play around. I had already had one colour which I loved but the other colours I was given are easier to use every day and for weddings etc - which means I can play more - woo!!.

These Indelible Cream Shadows are sold here in Brisbane at Makeup and Glow (www.makeupandglow.com.au) or can be purchased online. They are a beautiful smooth shadow that just glides onto your eye. They are highly pigmented so you don't need to use a lot. They are waterproof so for those Brides or Bridal party Makeup Artists it's perfect! I think the best thing about these are you can use them just as a bit of a colour everyday or you can use it as a base and add other eye shadows which will not budge for the rest of the day! Also, they don't crease - I was particularly excited about this as EVERYTHING creases on my eyes and these don't - hallelujah!

If you're a fan of the MAC paint pots these are an awesome alternative - and a lot cheaper (woohoo). There are 12 different colours you can choose from and only cost $19.95 - but remember if you're a Makeup Artist you get a 10% Trade Discount.

I have the colours - Immortal (Light Lilac), Bronze Frost (Bronze Gold), Gold Frost (White/Champagne/Gold) and will be adding many more to my Kit. I have used these colours so much over the last few weeks especially with weddings as it's a perfect base and lasts all day through sweat, tears and anything else that happens.

Please head over to Makeup and Glow and have a look at these beautiful products and of course if you have any questions regarding these products ask the beautiful girls there or ask me and I'll be sure to get your questions answered.

Hope you are all having a Beauty-ful Day/Night.

Belinda
xx


Saturday 1 September 2012

Review: Patterned Tweezers by Crown from Makeup and Glow

Hello Hello,

A little while ago Makeup and Glow here in Brisbane were kind enough to provide me with a few goodies to play around with. These amazing tweezers are one of the things they kindly gave to me.

Are you like me and are extremely picky with tweezers? Well these babies will not disappoint, and even better - they come in funky patterns!.

These tweezers are tapered so that they can pick up the smallest of hairs and makes it so much easier to pluck your eyebrows. I personally have tried some horrible tweezers out and I will not be changing anytime soon!.

They are lightweight so they don't get heavy in your hands while you're plucking your eyebrows and also for those of you that use tweezers to apply false eyelashes, the lightweight feeling makes it easier for your hand to stay still so you can apply those lashes with precision.

Makeup and Glow stock these babies in 5 different patterns so you can go for something a bit more fun or just stick to the classic black. I decided on the pink zebra prints -because seriously, what Female Makeup Artist doesn't want a little more Pink in their kit!!

They are inexpensive at a great price of $9.95 and the amazing thing about Makeup and Glow - if you're a Makeup Artist they provide a trade discount of 10% so it makes it a little bit more cheaper - can't complain with that!.

Check out other products and also the fun patterns here http://www.makeupandglow.com.au/Patterned-Tweezers-by-Crown-p-17665.html 

Especially, if you are a Makeup Artist - I would highly recommend checking Makeup and Glow because they stock all the Professional Makeup products that are extremely difficult to get in Australia - and they are absolutely lovely people to boot!

Have a Beauty-ful Day/Night!

Belinda
xx


Review: Maybelline 14 hour Super Stay Lipstick

Hello Lovely People!

The other day I decided to buy one of the new Maybelline 14 hour SuperStay Lipsticks, although they are quite expensive for a pharmacy lipstick (it was $18.95) I thought it would be worth it if it lasted the 14 hours.

I decided to buy the colour 065 "Ravishing Rouge". I thought the best one to get would be a red colour so that it wouldn't have to be touched up for that time.

So.... I tried this baby out... the first time I tried it, it was in the afternoon that I got it and I was just doing a few things around the house and then laid in bed watching a movie, because I wasn't drinking a lot or eating a lot it lasted a fair few hours perfectly. I wanted to give a full day try out, especially for you guys - so the next day I knew I was going out to lunch with my Friend so I thought if it lasts lots of talking, lots of eating and drinking then it would be my new best friend.

I was disappointed... After I ate lunch and chatted and drank I went back to the car to go back home and looked in the mirror - It was like the lipstick had tinted my lips but the full on pigment colour just wasn't there anymore. I still didn't touch up after that because I thought I'd take some more pictures throughout the day to see what it would look like. By about hour 5-6 there was still a slight tint but I wouldn't say it was red anymore.

Overall, it was a beautiful lipstick and what I liked about it is it's very nourishing and feels very very light - which I LOVE but the whole purpose of the lipstick is that it's meant to last 14 hours - and that it didn't. Especially, as it's $18.95 here in Australia I don't think I'd buy it again, as you could buy a less expensive lipstick that you can just re-apply every few hours.  

I have attached some piccies of what my lips looked like throughout the day.
   Picture 1 -Left Hand side top - Just Applied.
   Picture 2 - Right Hand side top - After Lunch/drinking/chatting - 2 hours after application.
   Picture 3 - Left Hand Bottom - 4 Hours after Application.
   Picture 4 - Right Hand Bottom - 5 Hours after Application.

If you're wanting to check out their colour range - there are 12 colours please check out http://www.maybelline.com.au/products/142/lips/lip-colour/superstay-14hr-lipstick/eternal-rose/020?shadeId=745.

Hope you're all having an amazing weekend!

Have a Beauty-ful Day/Night.

Belinda
xx


Tuesday 21 August 2012

How to: Long Lasting Red Lips!

Why Hello there!!

Tonight I thought I would do a blog on Long Lasting Red Lips. This is a HUGE trend at the moment and is such a beautiful and classic look. The only problem?... is getting it to stay so it doesn't start to fade after 10 minutes.

Well now you will know how to make it last a lot longer (woohooo).

    Step 1. Start with your lips dry (not moist) so that the products can stick to your lips easier. (some people like to put concealer on their lips, but I don't think that is necessary.

   Step 2. Put your red lip liner on. I always start around the lip line itself first as that's the hardest part.

   Step 3. Blot with a tissue. This just gets the left over lip liner off that doesn't need to be there.

   Step 4. Put your lippie on!

   Step 5. Blot that baby... just to set in to your lips a little bit more.

Then your ready to paint the town red (pun intended ha ha).

I always think when it comes to a Red lip or any coloured lip for that matter, that you need to keep it simple with the rest of the face, especially Eyes. I like just a bit of brown through the crease and a stronger black winged liner - I think that is a classic and stunning look. I will do a tutorial on that this week as well.

If you have any suggestions as always let me know!

Have a Beauty-ful Day/Night!

Belinda
xx


Step 1-5


                                                                       Ta Dahhhh

Wednesday 15 August 2012

Review: Schwarzkopf Extra Care Ultimate Repair

Good Evening lovely people.

Usually when I do a review on something I like to use it for at least a few weeks so I can get a feel for the product and make sure it works well before I spread the word.

This product is so amazing I have to scream it from the rooftops (OK, well that may be a bit over dramatic - but you know what I mean!)

I have the "ombre" hair style so going from natural brown hair, barely ever dying it. My hair was in awesome condition, but now because of the bleaching and then the toning every few months to stop it from going brassy my hair has gone a bit dry and was starting to look not as nice. I used to use Argan Oil but my hair started to get used to it and stopped helping.

The other day I started the search for something that can help my hair a bit. I was looking through the hair products at my local grocery store. Obviously, there was a lot of options but this particular product got my attention. It's the Schwarskopf Extra Care Ultimate Repair serum. It's a 100ml spray bottle and has 3x Liquid Keratin in it. All you have to do is wash your hair and towel dry it, then shake the bottle and spray it in your hair and leave it. I brushed it through once I sprayed it in. Seriously, I was AMAZED by the results and it has only been once. I did the treatment last night then straightened it shortly after then went to bed. I woke up this morning and my hair was so shiny and smooth but looked amazing. My Best Friend saw me and thought I had just had a hair cut because my hair was that shiny and looked so healthy. I had some split ends as I am in need of a hair cut soon but you wouldn't be able to tell at all now.

I am kicking myself that I didn't take pictures of my hair before I started the treatment but really didn't expect it to work this fast and for these amazing results. I will take some photos now and the more I use it I will document the progress and keep you updated :).

I purchased this product for $8.00 but I'm sure you could find it at other places cheaper. I believe this product actually comes in shampoo, conditioner as well. If you want me to try them out let me know and I can do before and afters.

If you would like to check it out or other products, do so - www.schwarzkopf.com.au.

As usual, if you have any questions or suggestions etc please let me know.

Hope you have a Beauty-ful Day/Night.

Belinda
xx

Monday 13 August 2012

Review: Laura Mercier Brightening Powder.

Well Good Evening everyone!.

Tonight, I thought I'd discuss this new product I have fallen in love with.

Laura Mercier Secret Brightening Powder -

This product is used for mainly putting under your eyes over your concealer. It sets your concealer so it doesn't move all day, but also brightens your skin so you look healthy and glowing. It has micronized pigments, but doesn't settle into lines and doesn't accentuate shadows. It is a beautiful light weight product that doesn't give you that heavy caked on feeling or look.

The thing I love about this is the fact that it brightens up under your eyes ( I currently have dark circles thanks to horrible sleeping habits - it's a very attractive look ha ha) but it is very subtle. It's not like banana powder that gives a very obvious lightness. As I also mentioned previously it is super light weight, Almost like you're not wearing anything. I fortunately don't have lines under my eyes yet but it is so light it won't sit in them and give them that very unflattering look.

I purchased this product at David Jones the other week at the Laura Mercier counter. Here in Brisbane it is quite hard to find a Laura Mercier counter so I took advantage of it while I was down there. There are two different colours #1 which is for light to medium skin tones and then #2 is for medium to dark skin tones. There is literally not a lot of difference between the two. I purchased the #2 so when I get a tan etc it will be safe, but saying that I use it without a tan and at the moment I have quite fair skin and it works perfectly with my skin. Here in Australia they have just put the prices down to $35.00 and I was told this was a permanent thing (they used to be $48.00 I think).

If you have any questions of how to apply this product or would like me to do a tutorial and use it please let me know.

Check it out on the website www.lauramercier.com

Have a Beauty-ful Night!

Belinda
xx

Tuesday 31 July 2012

Something ever girl should know!! Beauty Product expiry!

Hello Hello!

Tonight I thought I'd discuss something that every person who uses beauty products should know.

Make-up expiry inparticular is a very important thing to be aware of. Obviously, as we use them on our face, lips and eyes if we don't swap our products out and use them longer than we should, it could cause infection and spread a lot of germs and bacteria that we have on our face etc.

Something handy that I found out a while ago is there is a little symbol on most products that tells you how long they last for. Obviously, there are some products that you need to throw out more frequently like Mascara.

Look out for the symbol as shown below on your products and that is a good guide for you on how long you should use them for. Whether it be 3Months (3M), 6Months (6M), 12Months (12M) you should really abide by these guideline.

If you have any questions regarding this feel free to ask!.

Have a Beauty-ful Day/Night!

Belinda
x

Sunday 15 July 2012

Favourite Nail Polish! China Glaze: Flip Flop Fantasy!


I hope everyone is having/had a great weekend!

Tonight I'm going to talk about my favourite nail polish at the moment! I originally found a picture of this colour on pinterest (gosh it is addictive) and thought I NEEDED this colour! I am so obsessed with the corals and bright colours lately!! I found the colour at my local beauty supplies store - Salon supplies & furniture at Underwood.

The colour is called Flip Flop Fantasty and it is a hot pink/corally colour (the picture doesn't give it complete justice). I have gotten so many compliments on it!. The formula is pretty good, I only needed 2 coats and looks perfect. I found it has chipped pretty easily but I do have thin nails and unfortunately cannot control them chipping sometimes (oh wouldn't it make life easier?). I bought this one for about $9.00 but I get a discount from being in the industry.

If you're wanting a bright fun colour this definitely is the colour for you - plus they have many many more amazing colour.

Check out there website here www.chinaglaze.com.

Have a Beauty-ful Day/Night!

Belinda
xx

Review : MAC Moisture cover concealer

Good Evening lovely people!

The other week I went to the MAC store at Carindale here in Brisbane to check out there concealers, among other things. I decided to get a concealer , because although I am happy with my Cinema Secrets or Graftobian concealer Palettes, I thought as I am doing youTube Tutorials now it'd be better for me to use easier to get products as well.

They have many different types of concealers but I decided on the moisture Cover one because it is currently winter here in Australia and my skin can get a bit dry and obviously can help out a bit with that!.

So I've been using it for a few weeks now and I'm really loving it!. My colour is NW20 which the lovely ladies in store matches for you if required.  It gives quite a bit of coverage and blends in very well - with a nice consistency. Also, I have realised the places I put the concealer is a lot less dry, which is great! So far I have realised that a little goes a long way - which I also love because some people may find it expensive.

They come in 12 different shades so there should be pretty much a colour for every skin tone! I purchased this for $34.00.

Check them out on http://www.maccosmetics.com/

Have a Beauty-ful day/night!

and as usual if you have any make-up products, beauty product suggestions let me know!

Belinda
xx